Wednesday 28 March 2012

Atelier Sano: Maruyama House


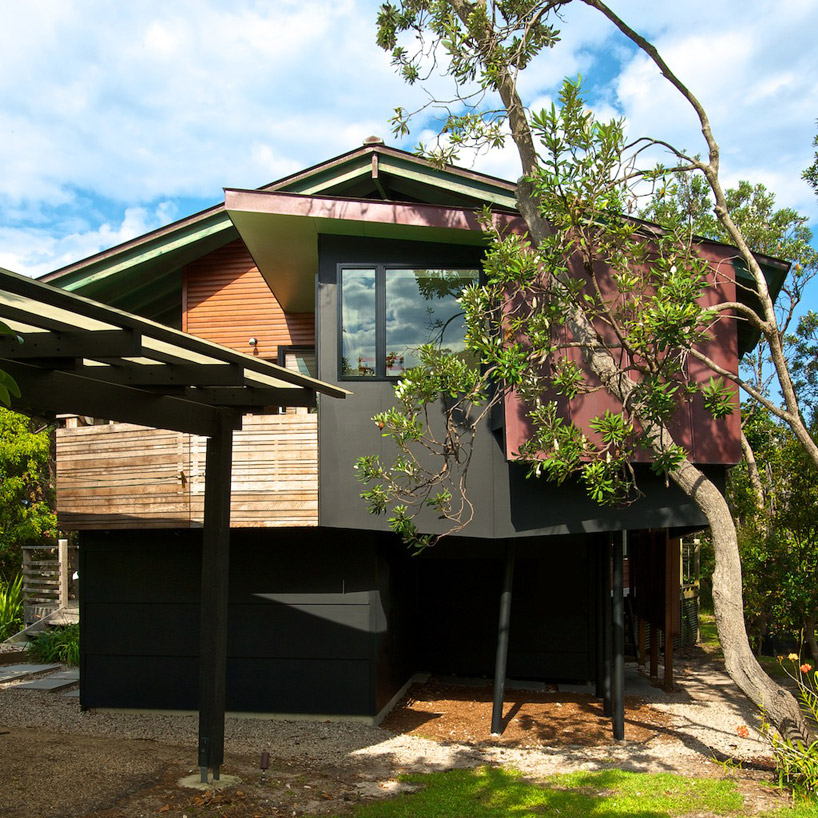
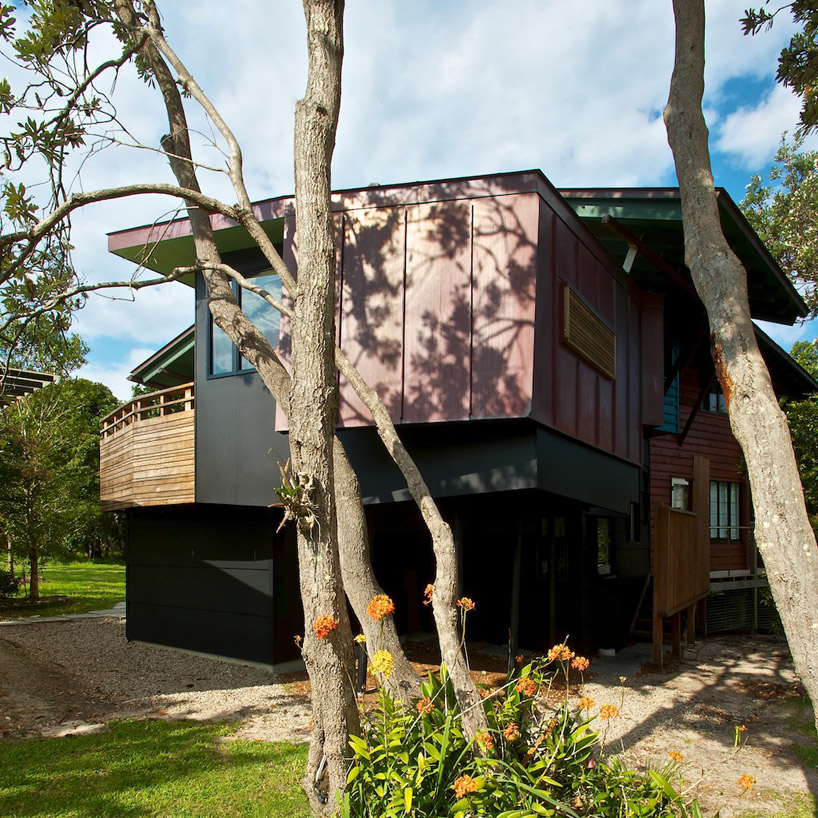
Japanese architecture practice atelier sano (takahiko sano) has shared with us images of 'maruyama house', a multi-storey private dwelling in sapporo, japan. Perched on an elevated site which overlooks the city below. The design seeks to capture maximum views in all direction by equipping each facade with floor-to-ceiling windows.


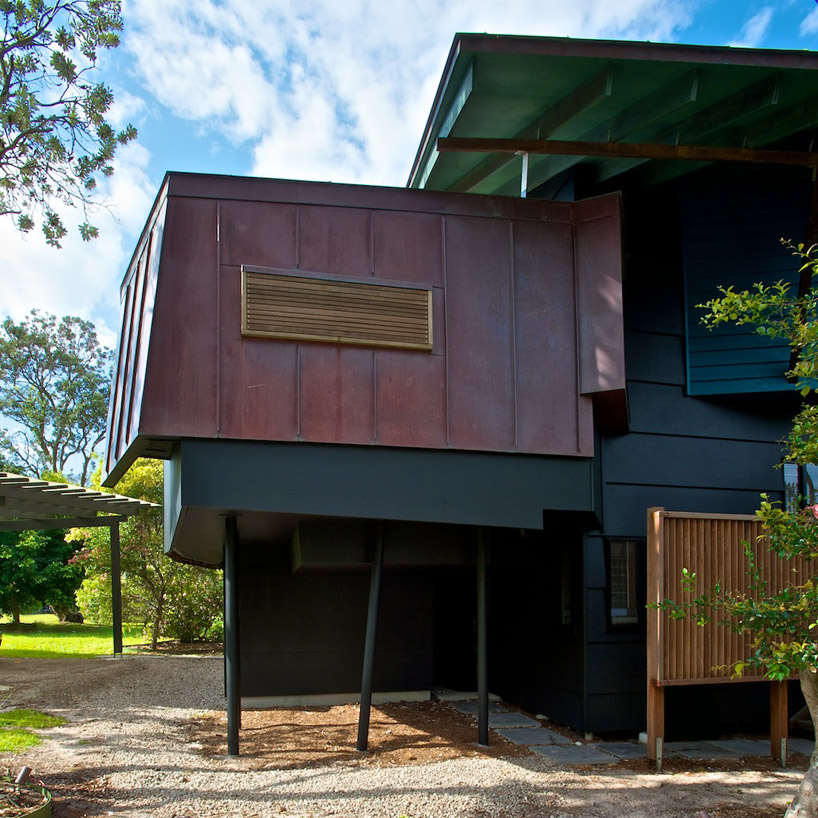
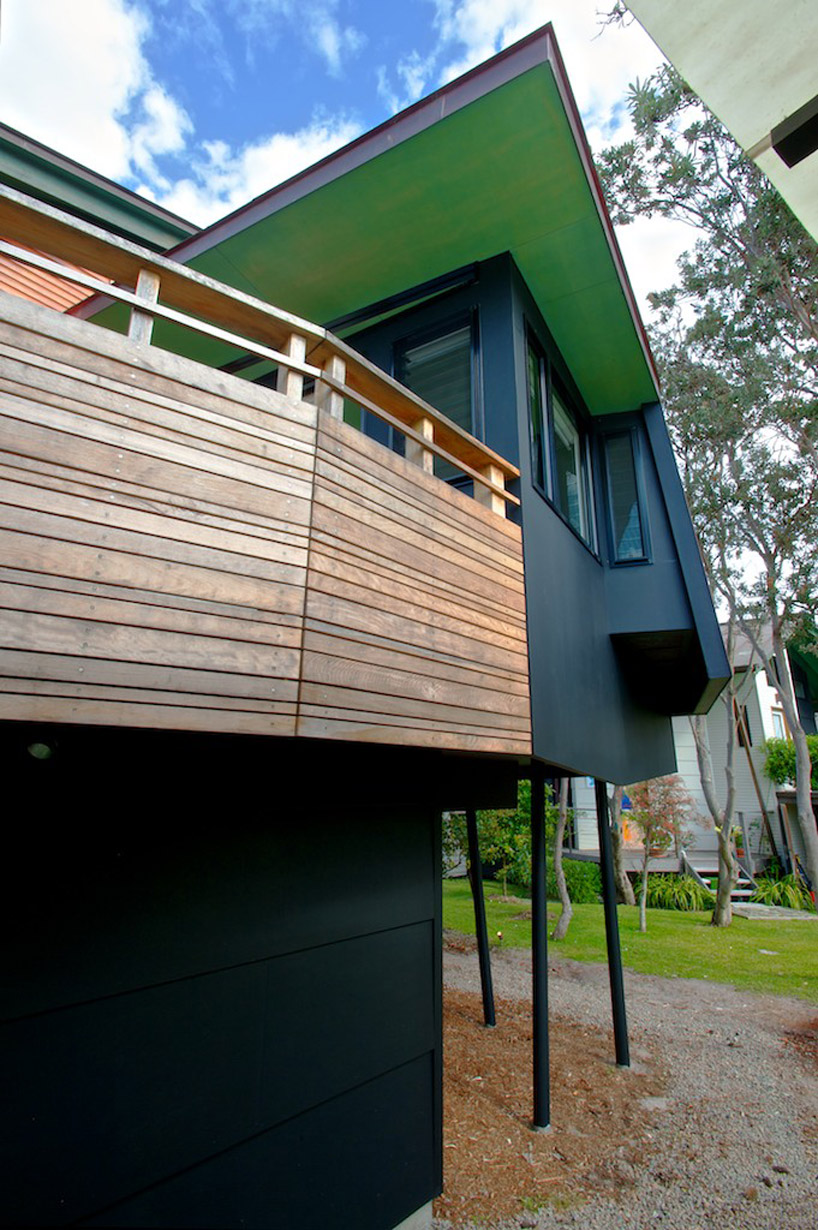
Read as a cross-shaped volume resting on a subtle concrete base, the exterior is completed wrapped in a wooden skin that lends a light quality to the monolithic structure. A small road branches off from the street to a partially-underground garage, freeing up the approach and entrance from any obstructions. A small collection of trees and shrubs provide a porous line of privacy around the plot.


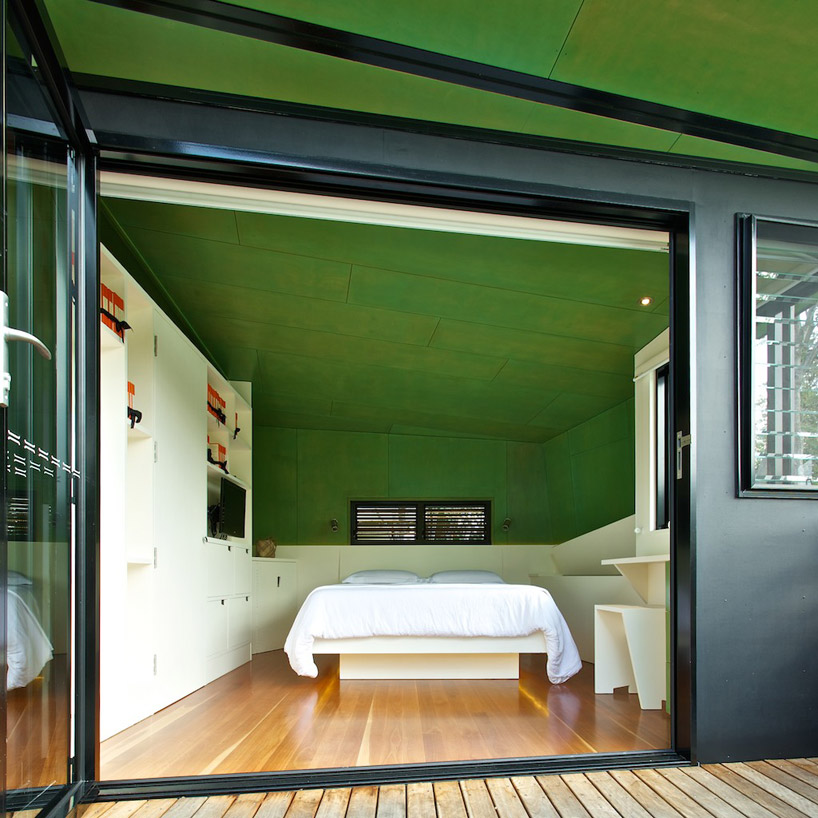
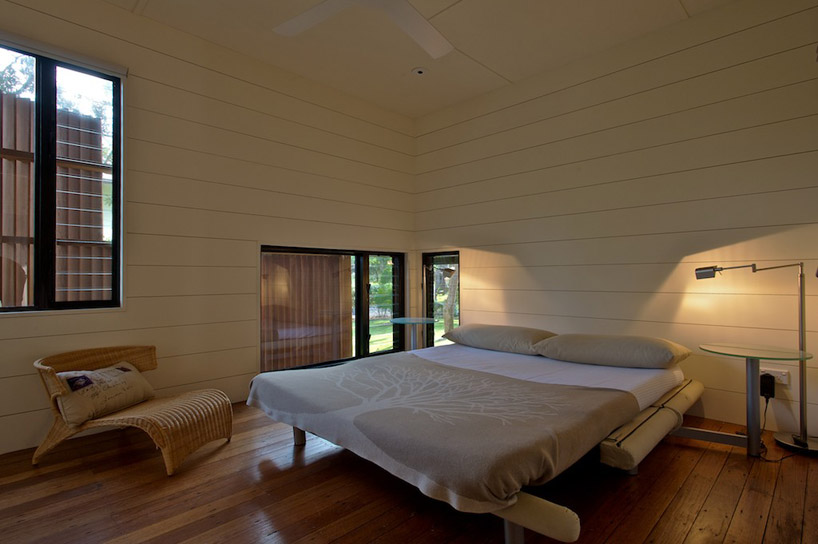
Surrounded on all sides by stretches of glazing, the interior space is seemingly suspended within the city and site. Panoramic views of the mountain scape serves as a backdrop to the living area, resulting in an open sense of space that goes beyond the layout of the house. Arranged as an open floor plan, the communal programs gain loose definition by a series of partial length partitions. Small spatial nooks and pockets are generated for more private programs while maintaining a free-flowing circulation and connection between inhabitants


'Maruyama House' by Atelier Sano in Sapporo, Japan
All images courtesy Atelier Sano
Image © Koji Sakai


Monday 26 March 2012

Roslyn Street Bar-Restaurante / Durbach Block Jaggers


5-9 Roslyn Street Potts Point is a triangular shaped site, less than 200m2 in size. The rounded end looks directly onto a small public space. The shape of the site exaggerates perspective; the tiny footprint amplifies the perception of height. 


The cornice is exaggerated to overhang the street, to suggest a room. The fine steel lined windows are slightly offset and casually misaligned. The awning splits to mark individual entry points on the street. On the street, it seems an ephemeral version of the neighborhood buildings, the rhythm held by the openings as the wall recedes.


Then, at the corner the building shifts to being strongly surfaced, curving in two directions, becoming a peninsular of moulded light. The surface of crackled tiles, a mixture of gloss and matt, white and biscuit, reflect and refract the surroundings. An exotic roof top garden of frangipani trees and seasonal plantings is framed in the sky through buckled openings.


Architects: Durbach Block Jaggers
Location: Potts Point, Sydney, Australia
Project Team: Neil Durbach, Camilla Block, David Jaggers, Stefan Heim, Lisa Le Van, Deborah Hodge, Brigitte Thearle
Project Year: 2009
Project Area: 197 sqm
Photographs: Anthony Browell, Peter Bennetts, Neil Durbach 

Uploaded by Megan Jett


Wednesday 21 March 2012

Sameep Padora and Associates: Creo


'Creo', a retail store designed by Indian firm Sameep Padora and Associates is located within a heritage building in Kemps Corner, the premium shopping district in Mumbai, India. Redefining the brand's identity as well as respecting the existing space, the previous displays were detached from the shell and replaced with a free-standing installation which integrates a new display system. Producing an intimate customer experience, the centerpiece structure is subdivided with semi-circular niches creating a chalice-shaped section.


Standing at 13 feet tall, the double-storey molded form accommodates lighting, shelving, display surfaces and a stairway to the mezzanine. Staggered in plan, the outward facing concave display spaces on the ground floor are reflected into convex partitions which enclose the upper level. An elevated lounge area provides guests with an area to rest while overlooking the street entry below through a transparent partition. The complex curved geometries were prefabricated with a cnc router and assembled on site. The white cast resin and acrylic skin generates a blank canvas backdrop for the brightly colored products and clothing.


'Creo' by Sameep Padora and Associates, Mumbai, India
image © Edmund Sumner
all images courtesy of Sameep padora and Associates


Monday 19 March 2012

Advice for Architecture Students


Times get tough for Architecture students desperately trawling through the RIBA Directory of Practices writing to every man and his dog in the hope that someone will be able to offer them an opportunity.  Firstly remember that practices are being inundated with applications so you need to make it obvious that you are instantly employable. Think from an employer’s perspective – an Architect running a business might suddenly find themselves with a tight deadline on a large drawing package. They need to know that you are up to the job, so good quality legible drawing samples are essential. You still need to get your personality across, but remember that the stuff you think is important might not necessarily be the thing your prospective boss is looking for.

Personalise the covering letter. An application with an anonymous covering letter won’t grab your prospective employer’s attention, however, spending a little time researching the practice you are applying to, perhaps mentioning key schemes that you admire, or explaining your understanding of their working ethos, means you’re more likely to get noticed. Flattery won’t necessarily get you everywhere, but it can help (don’t go overboard though; you don’t want to embarrass anyone!).

Think about the presentation of your CV and covering letter to prove that you’re thinking about the bigger picture, not just the fact that you have a degree in Architecture. A little thought about font, colours, graphics and layout will not go unnoticed. Make sure work samples are large enough to be legible. Low resolution images aren’t worth using.Spellcheck is there for a reason – don’t risk it, just use it!

 Don’t be afraid to ask for feedback about your application. Most Architects have been in your shoes at some point or another so will probably be able to spare a couple of minutes to chat with you about what could be improved.

Author: Lorna Parsons


Thursday 15 March 2012

Built-environment practice: The Barnacle


Brisbane-based firm Built-Environment practice completed their home, 'The Barnacle', a beach house near the coast in Broken Head, NSW, Australia. The 25 square meter extension offers framed views into the landscape of the community's nature reserve. Lifted on a cluster of inclined columns, the volume's exterior is formed with copper panels and plywood sheets generating diverse textures to create an intentional patch-worked appearance. A surprising burst of green colour surfaces the underside of the roof eave, transitioning into the bedroom. The compact configuration of the built-in interior furnishings invokes the notion of camping or sleeping within the berth of a yacht.


images © David Taylor photography
All images courtesy of built-environment practice

Tuesday 13 March 2012

How to Be an A+ Student in Your Architecture Studio Design Course

A studio design course in architecture school can be a very competitive and intimidating arena for any architectural student. Long hours, hard work, and presenting in front of people you don't even know can take a lot out of a person. Use the following tips to increase your chances of success in your studio.


Instructions:


    • 1
      Understand that although your particular design concept and project may be different from everyone else, everyone's project will be compared to each other, and it's the ones that stand out from the crowd (in a good way) that become A+ architecture students.
    • 2
      Your quality of work really matters. Put down that glue gun, throw away your #2 pencils - it's all about using the right tools to craft your drawings and models to look as clean and professional as possible. Trust me when I say this: your drawings and models are the first impression of your project, not your words. Make your first impression a good one by working hard to do clean and readable work.

    • 3
      Some tips about drawing plans, sections and elevations (by hand): Plan ahead, be patient, but know what you're doing. You will save much more time if you roughly sketch out what you're going to do first (it's called a cartoon drawing), and then take the time to precisely draw everything. If you're on a computer using AutoCAD (or any other drawing program), learn everything you can about the program, and use what you learned to your advantage (i.e. command shortcuts)
    • 4
      Some tips about model building: Your instructors will appreciate cleanliness and precision. Also, as far as the materials of the model, the less kinds of materials, the better. If you have 3 different types of wood, 2 kinds of metal and resin all in one model, the eye of whoever is looking at your model will be distracted and it will take away from the overall message of your model as a whole. Futhermore, if you're putting trees in the landscape around your building, don't use actual miniature trees. For one, because they look so real, your building will look less convincing, and secondly, it's seen as an easy way out. Be creative, be abstract - use basswood poles or create your own trees with the same material and color your base is made of. This will make your building stand out, which is the point of the model anyways.
    • 5
      Some tips about presenting: This is the scary part for a lot of people. My advice it to always know what you're going to say before you present. You don't have to map out each and every single word - as you should already be familiar with the details about your project after working on it for 3+ months. It's ok to make a note card with key points or items you'd like to cover, but make sure that while you're speaking, you're looking up and talking directly to who you are presenting to. If you need help with presenting, ask a classmate to be your audience so you can get some valuable practice in before the real thing. Offer to be his or her audience too, as you'll learn this way as well. Try and avoid using words such as um, like, or any other "filler" words. Avoiding filler words will make you look so much more professional, and you can bet that it will help you stand out from most of your classmates.
    • 6
      Some tips about work habits: It can be extremely easy to fall behind, so do your best to stay on, or better yet, ahead of schedule. You may need to make some sacrifices, such as late nights, less partying, and possibly less sleep. You can try and make a schedule, but honestly you never know how long something will take, and it always seems like when a deadline is near, time goes by even faster - so stay ahead of schedule when possible.
    • 7
      Some tips about "the plotter room": The plotter (aka printer) room is where students get print outs of their presentation materials. In my experience, plotter rooms have only one or two printers. Now imagine a deadline that is exactly the same for 75 students, most of whom wait until the last day to print, each on two printers that are slow, that can easily run out of ink, run out of paper, break down, or be used by another class that also has a deadline. The moral is to plan ahead or find another means of printing your presentation materials (possibly off campus?). Save yourself the stress, and do your best to get in front of the line.
    • 8
      Lastly, a tip about your designs: What is great about a studio course is that you have the freedom to be your own designer and come up with your own solution for a project. Making sure you have met all of the program requirements is the number one goal, but beyond that - you can do pretty much anything you want - kind of. Everything you do or propose should have a reason behind it. For example, if you had a high-rise project, and you decided to put an angle in it, your instructors and reviewers will absolutely ask you "why is there an angle in your building?" The difference between an average student and an A student is if you are able to answer these types of questions. If you just answered with, "Uhh, because I like angles," that's bad. If you answered with something like, "Because it decreases the amount of wind resistance on the building, as shown in these wind graphs over here," then you're getting it.


Friday 9 March 2012

Complex for the 7th international strawberry symposium


New york and Beijing-based practice dada have recently completed an exhibition center + hotel complex for the 7th international strawberry symposium in the changping district of Beijing, china. The 50,000 square meter site contains a training center, convention center and factory which are positioned near an agricultural area renowned for a tradition of strawberry cultivation and production. Buildings will host events for horticultural scientists and producers of strawberry products, offering a location to exchange ideas and collaborate.
White curvilinear shells enclose the spaces, varying in height and width depending on the scale of the internal programs.
The double curved walls are formed with SRC, a low-cost material comprised of composite concrete reinforced with fiberglass.
Prefabricated panels were quick to install, completion construction within 8 months. Evoking the textured exterior of the fruit, the facades feature a diagrid of operable diamond windows to naturally ventilate the inside. Inclined glass curtain walls shaded with a ceramic frit pattern line each entry elevation
.

A rainwater collection system encourages grey water recycling while geothermal heating and cooling support sustainability goals. Solar tubes control sunlight similar to fiber optics, introducing natural daylight as it is needed. The selected material for the exterior has a long lifespan, projected to last for a minimum of 50 years.


Wednesday 7 March 2012

7 Design Tips for Best Architectural Acoustics


Architectural design requires that acoustics be well thought out and coordinated. The sound spectrum must remain clear without portions distorted or missing. The paper, Acoustics and Sound Systems in Architectural Design, emphasizes how acousticians should be part of the design team early on. The author describes how it is important to avoid overlapping sound waves that project into a common space – this interference is what can distort the sound spectrum.

The following are 7 additional design tips to achieve the best architectural acoustics within a space. These principles highlight some of the most informative ideas found within Acoustics and Sound Systems in Architectural Design for best aural experience.

1) Watch out for SOUND REFLECTIONS. Straight surfaces reflect sounds back into the central space making sound clarity muddy.

2) Select ACOUSTICAL TREATMENT carefully. Different materials absorb sound frequencies differently. Make sure your acoustical treatments are absorbing the right sound frequencies.

3) Diminish ECHOES when necessary. Be aware that sounds traveling within 30 milliseconds of each other are perceived without echo. Sounds traveling after the 30 millisecond threshold become echoes of the original sound.

4) Don’t let other building systems get in the way. NOISE CONTROL is important to keep in check as other building systems (like HVAC systems) operate. Keep such clashing noises to a minimum.

5) Keep objects or other OBSTRUCTIONS out of the way. Objects that obstruct a sound path can block high frequency sounds. (Low frequency sounds can bend around objects.)

6) Get good PATTERN CONTROL. Make sure sound systems for a room get good sound coverage. This will prevent feed-back and other sound distortions.

7) For out-of-the-way listening areas get DISTRIBUTED SOUND SYSTEMS. Such “delay-fill” speakers operate with an electronic delay so the sound matches and is synchronized.

In the end, it is important to make sure that the architectural acoustics match the architectural function and aesthetic value of a particular project. Office conversations that needlessly travel to employee office spaces can be quite a distraction. Involve your acoustician early and coordinate design efforts to avoid uncomfortable and sometimes painful aural sensations. Architectural acoustics are important beyond auditoriums, theaters and religious spaces.

Kamlet, Rick. Acoustics and Sound Systems in Architectural Design. Archi-Tech. April 2005.

Monday 5 March 2012

Blue Forest: Eco-Perch


The 'eco-perch' is a quick to install luxury tree house unit by east sussex-based architecture and construction firm Blue Forest. Assembled with natural materials, the structure may be implemented within 5 days, minimally impacting the landscape with adequate site preparation beforehand. Contained within a 6 meter by 8 meter footprint, the combined kitchen, dining, living area and bedroom may comfortably accommodate four people. Wrapped with a continuous roof surface, its oval sectional geometry visually connects with the outdoor scenery through windows and a veranda formed with a deep eave. If placed beyond your personal garden, owners may acquire planning permissions to install the small dwelling which is expected to outlive 15 years. Linking to existing infrastructure is ideal although an on-site septic tank may be used. A variety of off-grid and renewable energy sources allow for complete independence. The interior may be redesigned and retrofitted to serve as an office, studio or classroom.


'Eco-Perch' by Blue Forest
All images courtesy of Blue Forest


Thursday 1 March 2012

Student Tips - Architectural Drawing


According to many experienced architects, free hand sketching is vital at any stage of an architect’s career. Since I have been drawing since I was in my teens, I found it quite enjoyable to start sketching again and I know most students in my classes carry multiple sketchbooks with them and sketch whenever they can. This is a good habit to get into early on. Another thing that our professors have us practice is to make various drawings of constructs (Models) we make and make analytical drawings. These exercises were not quite enjoyable in the beginning but I have come to appreciate the analytical drawings a lot. There are various types of architectural drawings. I found this article in Wikipedia that describe each type in detail. The main type of drawings one will do at the very beginning stage of their architectural career as a student are these:

Image from Wikipedia Gallery

One of the other most important type of drawing a student must try to understand and excel at are perspective drawings. Perspective drawings interpret apparent dimensions into a flat surface using a mathematical system.
There are a few types of perspective drawings:
  • Single-Point Perspective - Lines extending from all objects in the drawing converge back to one single vanishing point in the horizon. 

Single point Perspective drawing - (c) utdallas.edu gallery

  •    Two-Point Perspective - There are 2 vanishing points at the horizon. Lines originating at these 2 points define the depth and spaces in the drawing.
Two-point Perspective drawing - from utdallas.edu gallery

  • There are also multi-point perspectives such as 3 point perspectives. I have not done any drawings with 3 point perspectives yet.