Friday 27 April 2012

Little Known Ways to Make Snappier Elevations


Elevations dictate the impression we leave on people who see our work. Perhaps it comes next to clever planning with regards to hierarchy of importance. Though I would say these two must be coordinated during the planning phase, reality says most of the time, floor plans are given much more importance. As the saying goes: “when the planning gets tough, the tough drinks coffee and keeps sketching all night”. But how about the time huh? So I say, in times like this, when all we can make are “not so good, not so bad” plans, we turn to elevations – we make them look snappy, they pull us up by hiding minor flaws. Though the design really depends on you on how you mix and match patterns and shapes and themes, some of these tips may help.

1. Look around

I remember a quote I happened to read a long time ago while surfing the web and it says: “architecture is the art of plagiarism”. At some point I agree with this. It is all about mixing and matching designs you see around you. You may get your concept from a fruit, a car, a tree but when looking for immediate patterns, you can look at other buildings too. See what features you can get from it and mix it up with other designs you can see from other structures. Columns, ceiling designs, etc.

2. Use line weights

This one was really taught by my instructor really but I put it into practice after I have read it in an old book with a title I can hardly remember, it was like “Architectural Drafting and Design”. Actually there are four ways to use line weights but my two best bets are the shadow, and outline. In shadow, you use heavier lines on the parts where shadows are set to originate. And in outline, you use heavier lines on the.. outline (duh!) It gives emphasis to the structure and makes it look a lot better.

3. Gather some patience and add shadows

I’m not referring to shady shady stuff we do using pencils when were almost finished, bored and have nothing left to do. What I mean here are shadows that would really show where the light source is, and where shadows really are supposed to be cast. It adds a sense of depth and gives a hint whether the surface is protruded, round, empty, slanted, etc. It gives a 3-dimensional feel to the elevation which is actually drawn as 2 dimensional. Though it really eat up some time, it’s really worth it.

4. Do not use colors you cannot handle

This is the common mistake I see in many plates, they’ve got a good floor plan, great perspective, great elevation, but annoying color combinations. The “could have been” classy building looked like a dirty bitch. You get what I mean? Color is critical. It affects the mood of the people who sees it, and of course affects the overall look and feel of the building. So better settle with calm tone and easy to match colors like, white, brown, or better stick with monochrome.

Courtesy: Blogger at Archidumdum.com

Wednesday 25 April 2012

A valuable lesson every architect student should teach themselves


In my office, we predominantly do residential work. I’ve never worked on anything else, but I have heard faint whispers that once upon a time we did do some commercial work (I think its a lie).

At uni the story was the complete opposite; we spent most of the time doing pavilions – a type of building to this day I have never been into and experienced. This for me is a fundamental error in the way BA architecture is taught; how can a student come to grips with the world around them without first exploring the relationships they know best, ie there home.

Without being aware of it, we all fundamentally appreciate how we interact with buildings, and the most familiar spaces to us are our homes. What we are not so familiar with is why we move, interact with and use our spaces at home. We subconsciously are aware how much space we need to move through a room or to open a door, yet putting that into a figure, to interpret it into a new usable space is hard for those beginning their studies. Teaching techniques to help students understand their most immediate surroundings should be paramount on the curriculum.

I wish that my university had related the very first project we did to our own homes, or a room in our homes. Allowing us to measure the space, understand the relationships between the walls and the furniture, the sill height and the finished floor level. Instead of this informative, constructive logical first project we built costumes. Not so helpful. Working with a current known space, converting it into something else is the perfect way for students to not only work with spaces they appreciate, but to also familiarise themselves with the benefits of adapting spaces for clients. This is after all what I spend the majority of my working day doing, familiarising myself with the needs of the client, and realising the perfect home for them.

At my practise today I’m working on an internal room rearrangement and a side/rear/loft extension with green wall (2 separate projects). Understanding these spaces and how the clients and their families can use the spaces is paramount to their success.

So today my wish is simple: Students, go home and experience real architecture. Familiarise yourself with the space you occupy at home, to better inform the work you do at university. The benefits will be clear as you progress throughout your career.

Courtesy: Blogger at habitables.wordpress.com

Monday 23 April 2012

Communication is the key to success!


Master the way you speak as you would master the way you design.

We spend so much time with mastering our craft of designing and building, but when it comes to presenting or even chatting about our projects with a friend over lunch, we are not as prepared as we should be.

To be a great designer you must be able to speak well about your work.  This is especially important when entering the professional field.  You have to be able to speak to clients and the way you speak to them will dictate how much they believe in you to make them happy.

Communication is the key to success.

If you find yourself unconfident in the way you present, here are a few ways you can practice how to speak well:

  • Watch presentations and lectures. You will subconsciously pick up on how people speak and communicate with their audience.
  • Read.  The more you read, the more you will pick up on sentence structure and hierarchy of information.  Books are written to capture and organize an originally scattered idea.
  • Talk to people about your projects.  If the only time you talk about your project to someone else is during a jury, you’re doing it wrong.
  • Write about your project.  I’m not saying write a book, but even writing a little about your project will allow you to think in a different direction.  Instead of asking “should I glue this here?” you ask “Is this what I mean to say?”  There is a difference.


Honestly, being able to speak well is something you should just do no matter what field you are in.  It’s a hard truth, but life treats people better when they speak well.

Courtesy: Tips for Architecture School

Wednesday 18 April 2012

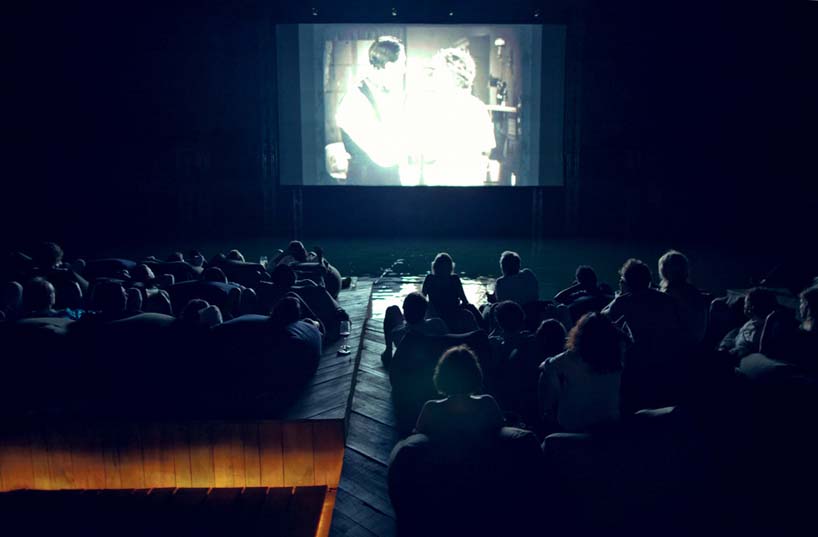
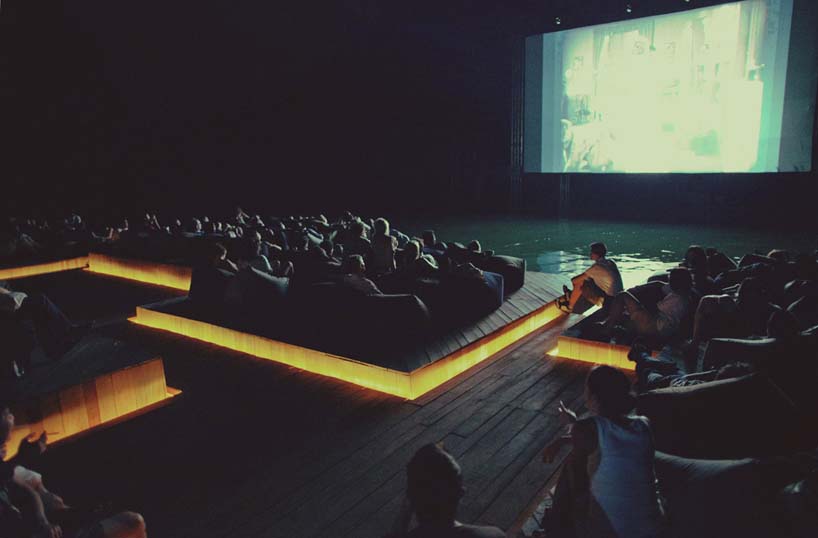
Floating Cinema by Ole Scheeren

photo by piyatat hemmatat

'Archipelago cinema' by Ole Scheeren is a floating cinema which premiered at
the inaugural edition of the 'Film on the Rocks Yao Noi' festival in Thailand.


The following text was provided by Ole Scheeren

Archipelago cinema, an auditorium raft designed to float on the sea, premiered at The rocks Yao Noi festival, curated by Apichat- Pong Weerasethakul and Tilda Swinton. The festival, which took place from 9th- 12th March 2012, is set to become an annual meeting place for art and film. The final night of the first edition of film on the rocks Yao Noi took place on archipelago cinema, designed by German-born and Beijing-based architect Ole Scheeren. Guests were taken by boat through the darkness of the sea to arrive on a glowing raft in the middle of the quiet waters of Nai Pi Lae lagoon on Kudu Island. Surrounded by a dramatic landscape of towering rocks emerging from the ocean, the audience experienced an atmospheric convergence of nature and cinematic narratives - primordial notions of light, sound and stories suspended in the darkness between sea and sky.


photo by piyatat hemmatat

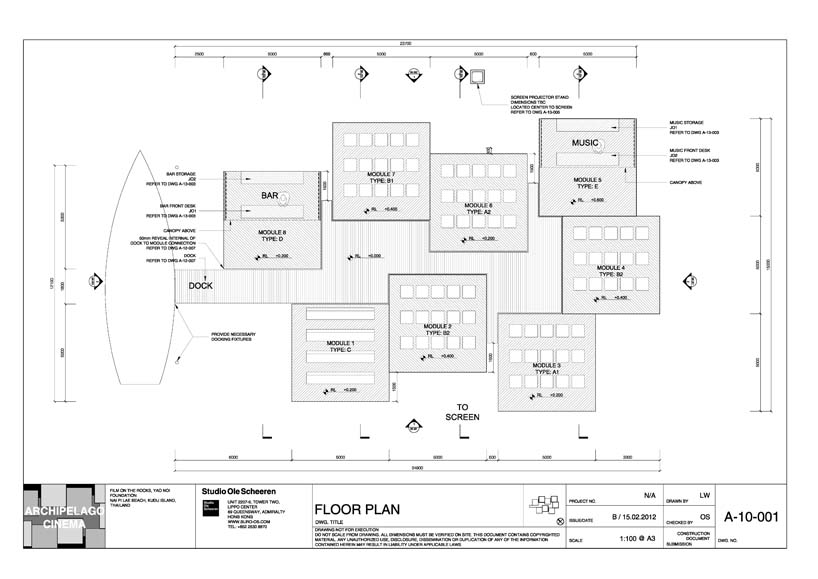
'The thought of watching films here seemed surprising,' said Ole Scheeren. 'A screen, nestled somewhere between the rocks. And the audience floating, hovering above the sea, somewhere in the middle of this incredible space of the lagoon, focused on the moving images across the water: a sense of temporality, randomness, almost like driftwood. Or maybe something more architectural: modular pieces, loosely assembled, like a group of little islands that congregate to form an auditorium. A work with a strong connection to the local community, archipelago cinema is based on the techniques used by fishermen to construct floating lobster farms. The raft is built out of recycled materials as a series of individual modules to allow for flexibility for its future use. Subsequent to a journey which will see the raft travel to further places as an auditorium for other film screenings on water, it will eventually return to the island and be donated to its actual builders, the community of Yao Noi, as its own playground and stage in the ocean. Archipelago cinema is a collaboration between studio Ole Scheeren and the film on the rocks Yao Noi foundation, founded by Nat Sarasas, Chomwan Weeraworawit and Apichatpong Weerasethakul. It is the first project of studio Ole Scheeren since he established his architecture practice, Buro Ole Scheeren, in Beijing and Hong Kong in 2010. With archipelago cinema, Ole Scheeren further explores his continued interest in non-architectural projects and interventions, and in creating alternative scenarios and realities by combining an ability to comprehend diverse yet specific contexts with the power of imagination and fantasy. Previous projects by studio Ole Scheeren which transcend the boundaries of architectural production include, among others, the Marfa drive-in (a drive-in cinema in the desert of Texas), and the exhibition cities on the move, which Ole Scheeren co-curated and scenographed in Bangkok in 1999.


photo by piyatat hemmatat


photo by doug bruce

photo by sixtysix visual

photo by sixtysix visual

photo courtesy film on the rocks yao noi foundation

The Plan

Courtesy: DesignBoom


Monday 16 April 2012

Planning a Residential House: Space Requirements


Planning a residential structure as simple as a house is one of the most basic problems an architecture student may encounter. Designing a house for a family at most may sound simple, but this is where our skills and knowledge about the field we chose to take are put to the test.

This, most of the time, is what instructors give to baptize students as their first major plate or esquisse. So if you don't want to be humiliated on your first defense, or get your hard worked plate full of red markers and embarrassing comments, then, read on.

First of all, we must know that to be able to build something efficiently, we must have an idea what it is, how to use it, and what its purpose is. Because planning something you don't know is like drawing something you have never seen before. And this part is what really makes design problems a pain; the "research" part. But with this type of structure, we don't really need so much research anyone reading this, AT LEAST, has an idea what a house is, what it's like to live in it and what it is for. So from this, we move on.

Space Requirements

Knowing what we are building also means knowing its parts. In design problems like this, it is popularly referred to as "space requirements". There are a lot of spaces that we can associate with a house. But this really depends on many factors and circumstances like the lot size, users, budget, wants and needs of the client, and many others. In this article, we will only include the parts that are of high importance, or the most essential spaces of the house. And these are the living area, dining area, kitchen, toilet & bath, and the bedrooms.

The Living area is where the family stays most of the time, this is where they chat, exchange stories, have fun and bond together.
The Dining area is where food is served and meals are taken - most probably the 3 primary meals of the day.

The Kitchen is where food is stored; utensils and other kitchen and dining wares are kept. This is where meals are prepared and after-meal chores are done.
It is hard to live in a house without a clean and tidy bathroom, or to be more technical and specific, Toilet & Bath. Enough said.

The Bedroom is a personal space of the person who uses it. And here is where people sleep, obviously. Keyword: personal.

As stated earlier, there are many spaces that we can consider in planning a residential house. It is up to us if we would like to add more in our layout. Other spaces we can include are the Foyer, Lanai, Gallery, Porch, Laundry, Veranda, Game, Theater, and many others. And of course if the given circumstances allow, be open with what we can always add to the plan. Being creative and thinking out of the box is always a plus. Just make sure to always have a REASON for every move you make in your plan. Doing something for nothing just always sounds dumb (or it really is).


Courtesy: ArchiDumdum.com

Thursday 12 April 2012

Planning a Residential House: Planning Considerations


There are many points to consider in planning a residential house, or basically any structure. Some of these are, zoning laws, height, electrical and mechanical facilities. But in this part, assuming that all we need is a basic plan and design, without other complexities like electrical and mechanical layouts. The author extracted the ones that will greatly affect how we lay things out on our plan. And these are circulation, orientation, light and ventilation and minimum space measurements.

Circulation is very important in planning any kind of structure or institution. By analyzing the actual circulation of users of the structure, we can design a more efficient space, and having a more comfortable and organized traffic.

Orientation dictates how we place the different spaces of the house in concern with the cardinal directions (north, east, south, west). From the direction of the sunrise and sundown, to the wind patterns, orientation plays a major role in influencing how the users would feel in the different parts of the house.

Light and Ventilation is not in this list for no reason. Who doesn't want natural light and air circulating the house. Not only that, natural light and ventilation gives several benefits against its artificial counterpart. It helps save energy, first with lights and secondly with the overall temperature of the structure. This part primarily concerns our placing and positioning of windows and doors. Where should they be, how huge or small, etc. We must always pay attention to this in our every plan.

Superstitions sometimes are obstacles or something that makes planning a bit more complicated and confusing. Like Vitruvius said, "in order to reach the holy ground of architecture, one must have, at least, a dip into all knowledge and arts". And one of these, unfortunately is superstition. This concerns the placing of windows, doors, stairs, complicated numbers and the like. Feng shui is one strong example of this.

Minimum Clearances, if not taken into consideration, will really push the red markers to set sail on your work. Minimum means the least measurement that a space can have. So this seriously adds up to the headache and the research too.

Planning a residential house sounds really easy as this structure is very familiar to us, but it is not. So if you find yourself having headaches experiences, then you're on the right track. It is really confusing, but once you overcome the confusion and finally come up with a GENIUS solution, everything just suddenly feels great and drafting becomes fun.

Courtesy:  ArchiDumdum.com

Tuesday 10 April 2012

LIVE architecture: Charkha


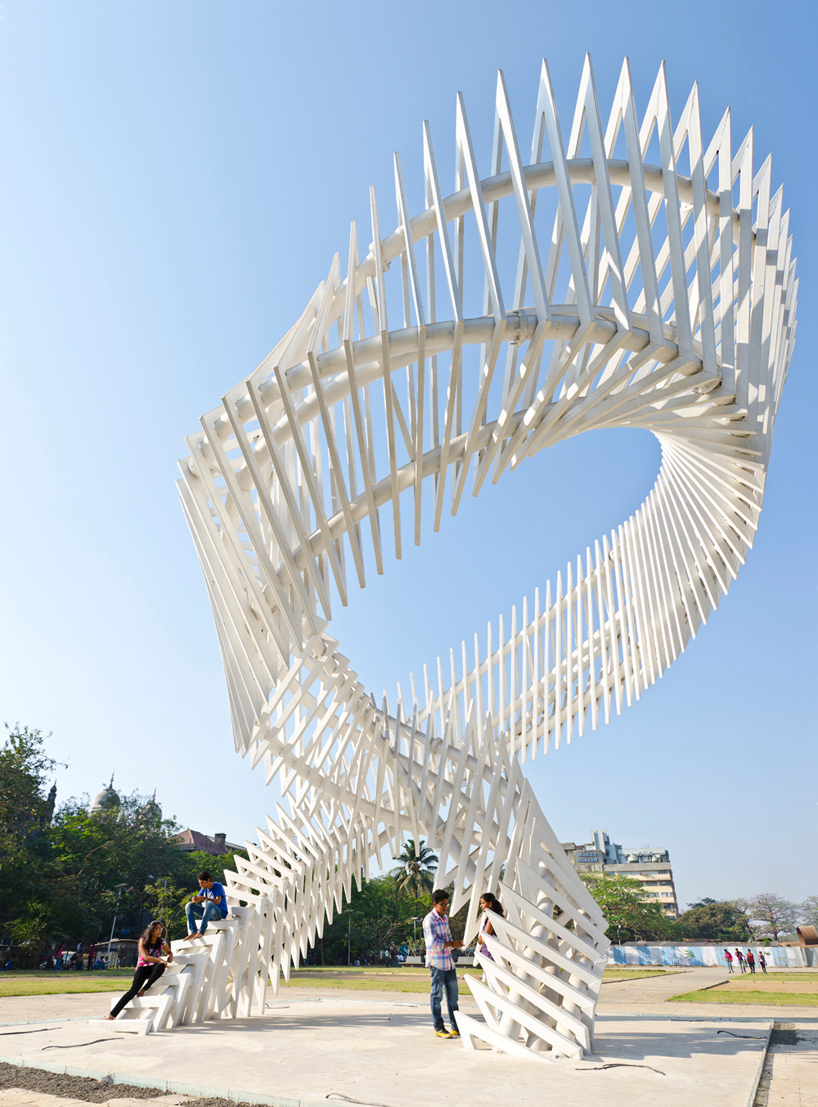
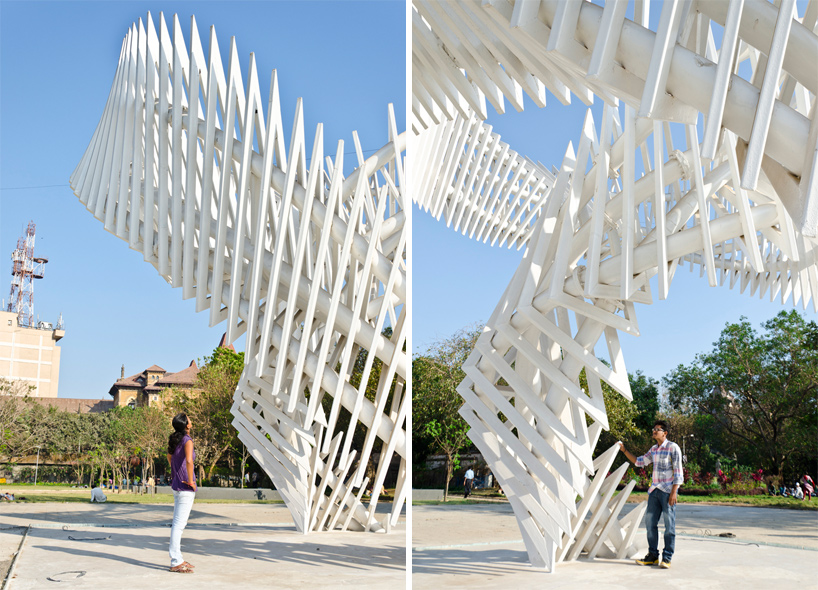
Indian practice LIVE architecture (Nuru Karim) has sent us images of 'Charkha', an 11-meter tall outdoor Installation in Cross Maidan, Mumbai, India. The winning entry in a monument design competition. The project draws from the 'spinning wheel' symbol promoted by mahatma gandhi to illustrate contemporary India's spectrum of social and cultural dimensions.


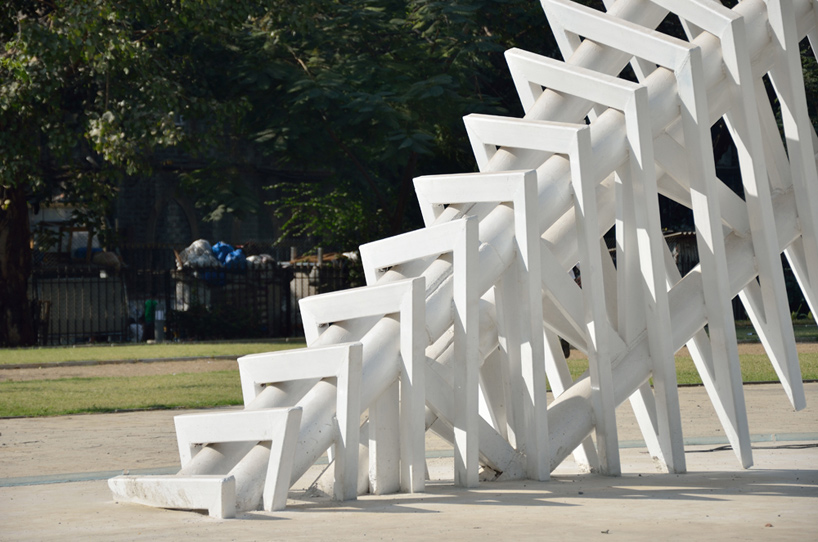
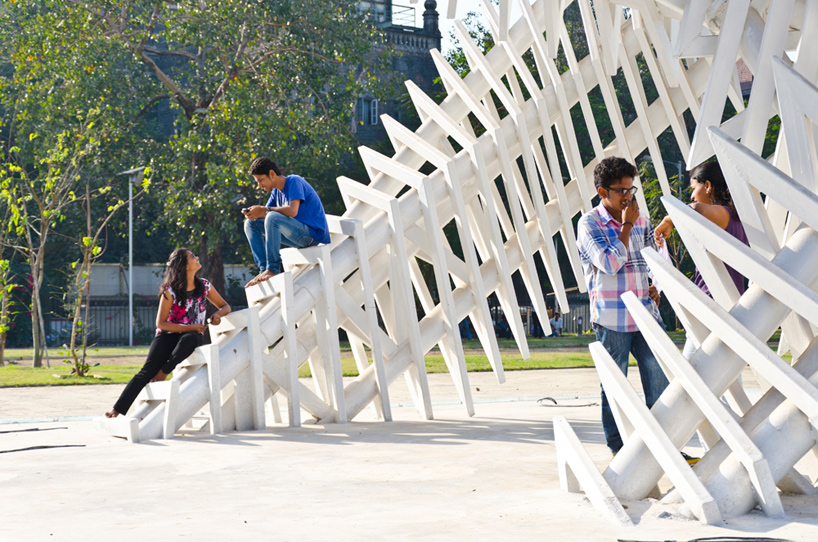
Composed of a series of triangular frames, the sculptural piece is a spatially dynamic structure that seemingly shifts in form depending on the viewer's vantage point. Three curving columns serve as the framework's backbone, allowing the installation to cantilever in one direction before returning to the 9m x 9m base. Each of the triangular units are individually unique, representing the notion of 'unity in diversity' as well as the nation's richness of multi cultures.


Developed using a digital applet, the spiralling gesture of a spinning wheel was explored with multiple parameters in play: diameter, density, speed, and geometries. Once a self-sustaining structure was defined, the sculpture was prefabricated in six separate pieces before being assembled on site. While largely an abstract interpretation, the design represents the ideology of the spinning wheel and India's sustainable progress through its visual motion and construction.


'Charkha' by LIVE architecture in Mumbai, India
All images courtesy LIVE architecture

Wednesday 4 April 2012

Essential Elements of Your Building's System


Water damage can wreak havoc on any co-op or condo. When it leads to serious problems like mold and structural damage, it can be a costly problem to address. To avoid the cost and hassle of dealing with water damage after the fact, it's not enough to simply trust in the waterproofing elements integrated into your building during its construction.

The exterior elements of a building are its first line of defense against the elements, leaks and water damage. In addition, interior materials serve to reinforce the exterior building envelope. Making sure both are properly waterproofed is a critical component of protecting your co-op or condo from leaks and water damage. Understanding where the most vulnerable areas of your building's facade are and knowing when to call in a professional are essential to protecting your co-op or condo from water damage.


Key Components of Waterproofing

The exterior façade and the associated building envelope elements make up the key components of a building's waterproofing system. Constant exposure to weather—and New York City pollution—over time will cause these elements to deteriorate, necessitating repairs and replacement of various parts of the system

Because an integral part of waterproofing systems is located beneath the façade, buildings are waterproofed during construction. In addition to the façade, the foundation is also waterproofed to head off any leaks below ground.

The Main Culprits

Essentially, any part of a building exposed to the elements is prone to wear, and thus has the potential to be a point of moisture penetration. Specifically, the roof, foundation, parapet wall and windows are all prone to leaks.

"Very often, a building will leak from the top down because for the most part, water accumulates at the top of the building," says Alan Epstein, president of Epstein Engineering, PC in Manhattan. "These areas have to be properly constructed and include waterproofing membranes and flashing systems. A building's windows are also vulnerable spots, because there are a lot of openings around windows that have to be properly sealed and caulked in order to prevent water penetration. Another vulnerable area is the pointing–or mortar–between bricks, which is that material that looks like cement. Re-pointing the brick replaces the mortar and helps protect the building from water entering through the façade."

Buildings new and old alike are vulnerable to water damage. Shoddy construction on newer buildings can lead to a leaky façade, and older buildings have likely experienced damage due to exposure to the elements over many years.
"Interestingly, poor construction is one of the main culprits of leaks," says Epstein. "Leakage occurs just as frequently in new buildings as old. Many are put up in a hurry, using cheaper materials and this can result in poor construction. Age also can be a factor, as older buildings weren't built with the same science and technology we have now, and many membranes were not of the same capability as the current materials."

Terraces also constitute another possible point of entry for leaks.

"The terraces are very vulnerable," says Wayne Bellet, president of Bellet Construction in Manhattan. "The cantilevered terrace floor is a three-sided configuration. This protrusion or extension of the building's floor is exposed on three sides: the top, the side and the underside. It has metal reinforcement bars in it, and when moisture saturates the landing and hits the rebar, the PH rusts the metal, which then expands and displaces the concrete around it. This is one of the most delicate waterproofing matters to date."

With respect to the areas around windows, lintels may also need to be replaced to fix or prevent water from coming in.

"At the top of the window is a little piece of steel called a lintel, which holds the brick up," says Bellet. "When water gets to steel lintel, it rusts and ruins the membrane behind the lintel. When the membrane is not in place, water has no choice but to run in, as well as out. That's a big issue today. Eventually, all [windows] will all have to be re-waterproofed."

Going Underground

Seepage and water damage aren't strictly aboveground problems, of course. One of the most common areas in which buildings experience leaks is the foundation, because cracks can occur in the foundation wall the same way they do in a terrace or façade.

"The foundation will crack, but whether it leaks or not has to do with the weather and the sloping of the site," says Michael Melworm, president of Premium Technical Services Corp. in East Meadow.

The specific type of foundation a building is built on dictates how it will be waterproofed or repaired. For example, on a poured foundation wall, a pressure grouting system is used.

"This injects a type of grout depending on the flow of water that's entering and the size of the crack," says Melworm. "A block foundation would use either an exterior membrane system on the positive, or outside, side. On the negative, or interior side, you could try a membrane system, but that's less likely to work. In that case you'd use an interior perimeter drainage system."

Identifying Problems

Because it is better to head off problems before they start, Bellet recommends setting up a maintenance plan to deal with leaks and repairs before they occur or get out of hand. He suggests routine inspections and monitoring with a digital camera.

"Planning sets up managers and future boards to get ready to think along these lines," says Bellet. "Boards will come and go, and when there's not a planned program in place, the next board has no clue and they have to start at square one. Mistakes in this industry are very expensive mistakes. It's also inconvenient because you've got to set up sidewalk sheds, and there's noise and dust to deal with."

During and After Repairs

If your building requires extensive repair work, or repairs on upper floors to find and eradicate a leak problem, be prepared for some disruptions.

"Repair work can be complicated because it involves working from scaffolds," says Epstein. "The first thing that has to be done is that a sidewalk bridge is erected to protect the public. A lot of work is done under difficult conditions, such as working high up in windy and cold weather. You have to accomplish rather intricate work, repairing areas that have proven to be problematic and at the same time doing maintenance work, like replacing pointing or caulking before it fails."

After the leaks have been properly fixed, any affected interior walls will have to dry completely before they can be repaired. It's also necessary to conduct follow-up inspections to ensure that the leaks have indeed been stopped before any repair work begins on affected walls.

"Even after leaks are addressed, there will often be stains on the walks and ceilings of the interior spaces, which lead to the report of water penetration," says Epstein. "They must be allowed to dry out, because the plaster and paint will only deteriorate if they're not properly dried. From the time the leak is stopped, it could be several weeks before interior can be repaired."

Water damage and leaks can have a devastating effect on your building. But routine inspections and working together with your maintenance staff to head off leaks is the first step in keeping your waterproofing envelope in good shape. If leaks have already occurred, calling in a competent expert as soon as possible and getting repairs underway is critical to preventing further damage to your building, individual units and the health hazards that accompany mold growth.

By Stephanie Mannino, a freelance writer living in Pennsylvania and a frequent contributor to The Cooperator.




Monday 2 April 2012

Mountford Road / Shaun Lockyer Architects


The “Mountford Road” project is a small but dramatic intervention into a 1950’s post war house, originally designed by the “Bell Brothers” (also well known for their furniture). The design exercise comprised essentially two aspects to the brief; the first being about the pragmatics of accommodation needs, while the second was about light, volume and air. 


The pragmatic side of the brief was about providing a more cohesive living, dining and entertaining space that could better connect with the existing outdoor courtyard. This part of the brief was satisfied by adding only 40 square metres whilst reorganising the balance of space within the existing house. Ultimately a new kitchen, laundry and dining space were added in the new “pod” while the living room, outdoor courtyard and entry where recalibrated within the exiting fabric.


The more “aspirational” side to the design was about maximising the north light and engagement with the external environment, while trying to mitigate loss of privacy from planned extensions from an adjacent property. This part of the brief gave rise to a double height timber clad extruded space that was punctuated by high and low north windows which offered controlled views and free access to light and sun. The rear wall of the “pod” forms an aperture to a pre-existing established garden court that forms a rich but calm backdrop to the minimal, stark space. The scale of the space is also varied between the older, more compressed living room to the liberated volumes of the new.


Pragmatically the design offers controlled, private and secure entry into the “rihad” or private courtyard via a redesigned entry albeit in the original location. This “rihad” is the fulcrum about which the new and the old part of the house balance themselves. The entry sequence into the house itself remains as it were albeit with new crafted timber doors that afford the greatest possible connection between the internal and external spaces. The new “pod” also offers winter and summer alternatives to the outdoor accommodation such that the space can be fully utilised year round.


The new materials used in the house were envisaged to compliment the pre-existing brick and timber fabric. New (but distinctly different) weatherboards articulate the new “pod” while the use of timber internally offers a more direct but equally contemporary connection to the work of the Bell Brothers. The restrained palette is deliberately conceived to reinforce the idea about the space being a blank canvas for light, air and life to furnish. There is quietness to the space while still offering richness and contrast that comes from the rich timber and white wall contrast.


This is a small project but an intimate one. The outcome is a reflection of the client’s life, interests and passion. It is a house designed for family to gather, grand kids to play and friends to visit. The architecture it there to serve life’s greater needs and the outcome is reward for the client’s hard work throughout the process and more broadly, their lives. There is a real sense of joy within this project that we hope will resonate with all who should experience it for themselves.


Architects: Shaun Lockyer Architects
Location: New Farm, Brisbane, Australia
Project Team: Shaun Lockyer – Design Principal; Shane Marsh – Project Architect; Richard Pain – Architectural Technician; Corinne Bolton – Interiors
Structural Engineer: Westera Partners
General Contractor: Waymore Constructions
Project Year: 2011
Floor Area: 160 sqm (existing), 42 sqm (additional area)
Photographs: Aperture Photography